Phoenix Comicon 2014 was AWESOME!!!!

This year was my second time attending Phoenix Comicon, and my first time as an official volunteer photographer or Contog. I was able to attend all 4 days and I had a blast. Here are some of my favorites!

Ace Ventura


John Barrowman (Doctor Who and Torchwood) signing autographs


Random man enjoying a comic book in the exhibitor hall.


Doctor Who Cosplayers


Duct tape costume contest Wookiee. (Yes, I had to look that up to see if I was spelling it right)


Disturbing dark figure on the escalator.


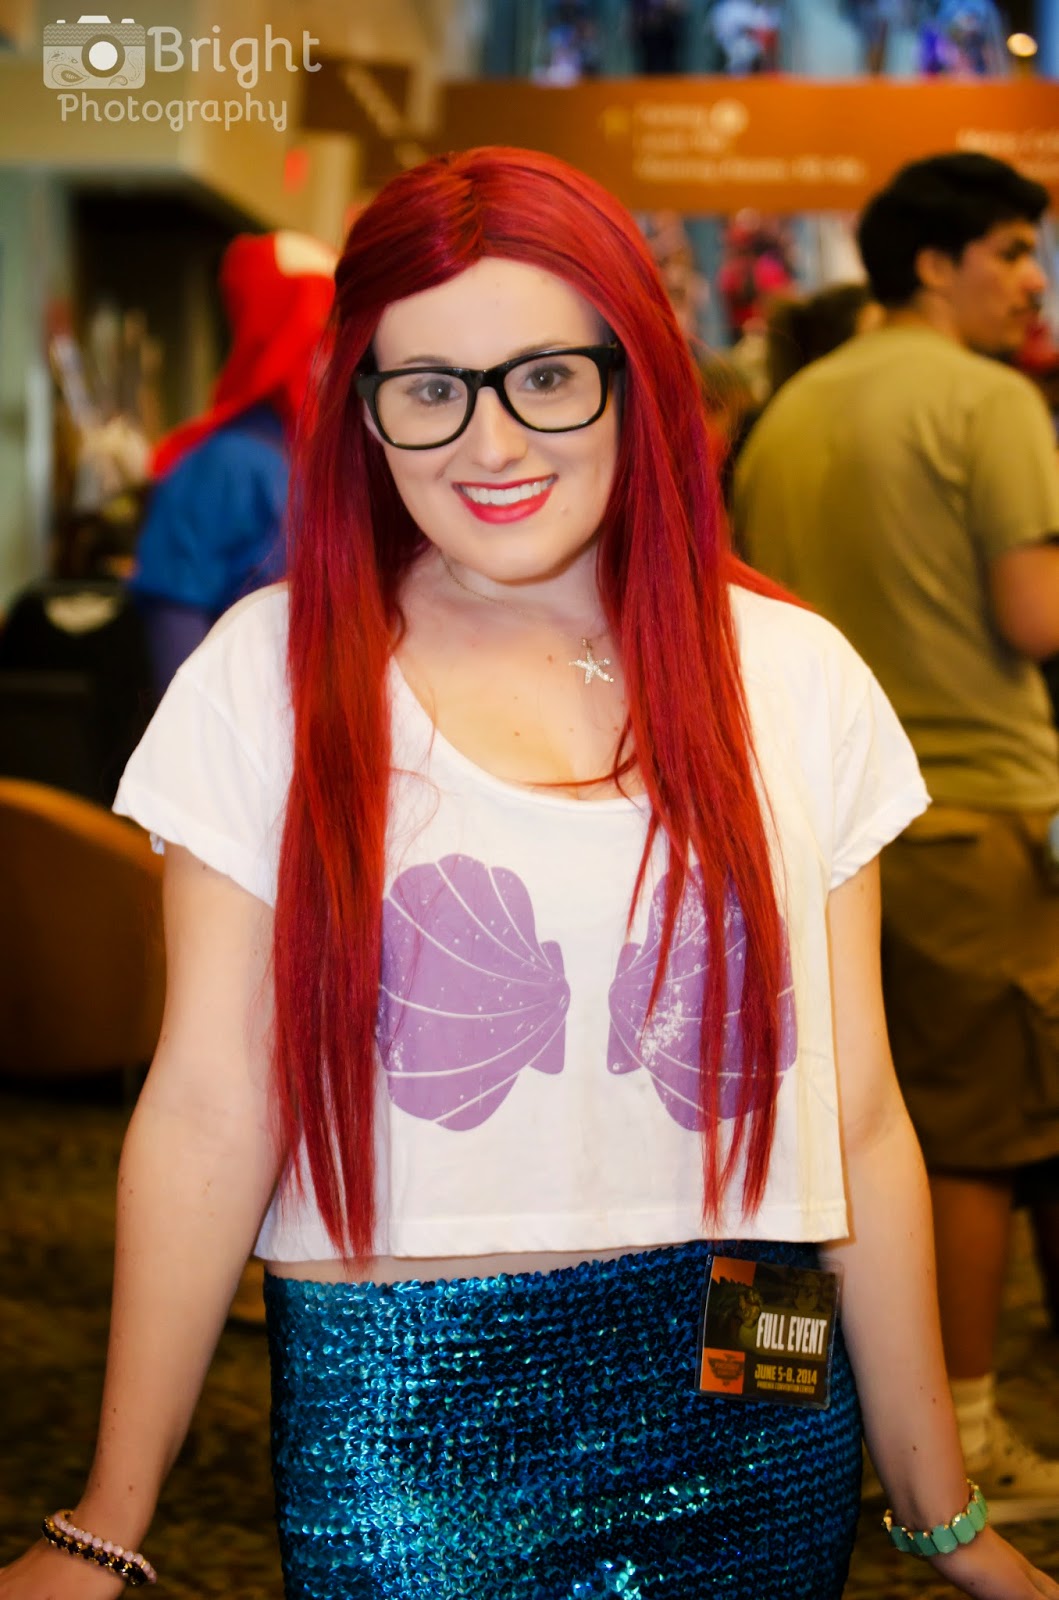
Hipster Ariel


Iron Man / Tony Stark


Jayne and Kaylee from Firefly


Moon Mermaid, her friend the Kraken, and an unfortunate pirate.


Lego Build-Off contestant


Superman and Deadpool battle with lightsabers.


Mermaid lounging at the outdoor lagoon.


Ninjas resting in the lobby at the Hyatt.


Michael Blaney and his new card game.


Guests planning their day.


Samara, coming out of the TV (The Ring).


Joe Holt explaining what a Nerf-Herder really is.


Walking Dead, Michonne cosplay with her slave zombies.


I can't wait until next year! If you want to see more Comicon awesomeness, go to Phoenix Comicon Flickr. There you will find more of my photos, as well as those of my other Contog friends. 

Mommy So Pretty!

One of my favorite memories was of a time when my mother let my brother and I do her hair and make-up. It was a rare treat to play with colors and relay our creative abilities onto her willing canvas, a.k.a her face.
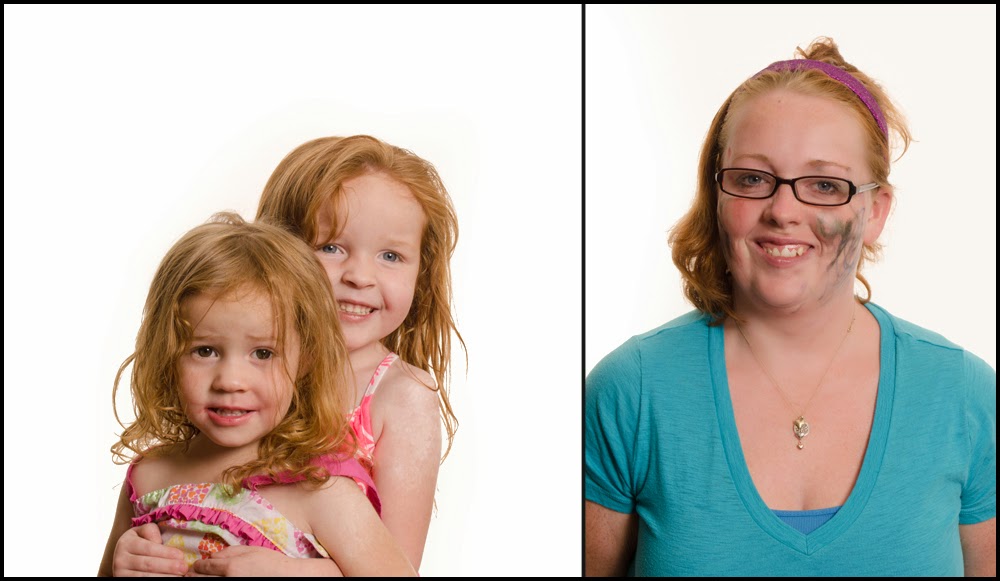
Children have so much love for their mothers and beam with pride whenever they share their drawings.  I came up with this concept a while ago and as it is Mother's Day weekend, I thought the timing would be perfect. I sent out a message on Facebook and invited all women with children ages 2-5 to come to my house for a special photo shoot. I informed them that they need not do their hair or make-up as that would be done for them before the photo. I carefully avoided telling them until they arrived that their own precious toddler would be their make-up artist and hair stylist. While reactions ranged from welcome to apprehensive, all the moms stayed and had a fun time watching their children make them so pretty. I have included the documentary photos as well as the portraits to this blog. 


Mr D. took a while warming up to playing with the make-up. But once he did, it was wonderful. He chose to put a tiara on his Mommy.


Since this little guy is the only boy in his family, he doesn't get too many opportunities to do fun make-up stuff with Mommy. This was a great bonding activity. Look at the focus on his face!


Miss M. focused much of her artistic attention to only one side of her Mommy's face. Still so pretty!


My friends were complaining that I wasn't getting a make-over, so I joined in the fun with my youngest daughter. She wanted to put make-up on herself almost as much as she wanted to do put it on me. I am pretty good at directing a shot, but I am so awkward in front of the camera. My sweet husband helped take my photo.


Some of the Mommies chose to reciprocate the love by putting make-up on their children. Note: There really is no way to pose a toddler, I just have to shoot and pray that I got a good shot. Sometimes toddlers give me the best poses like the one below. 


This poor Mommy was doubly decorated, as both her little girls participated in making her so pretty. The hair style is great too!


I made sure that the children wore large shirts so they didn't get any make-up on their clothes, and sheets on the Mommies for the same reason. Looks like the sheet was slipping in this shot. 


The stylish Mommy is wearing green eyeshadow on her forehead and blue mascara this season. At least that is what Miss H. had in mind for her favoritest Mommy ever. 


Miss A. believes that it is all about vertical line patterns. One must also apply every shade in the lipstick pallet directly to the cheeks


I am so grateful for the wonderful participants for this project. It was so much fun!
If you liked this entry, go check out Adults eating like Babies!

Ghosting on Halloween

I would first like to state that this project is best suited for those who can sit still for a long exposure. Let me share some of my more successful attempts at this strategy before going into the tutorial.

This image of the water spirit was my first attempt at "Ghosting" back in 2011. It took a couple tries, but luckily my parents were good sports.


 On Valentine's Day this year, I drove down to Tombstone for an assignment and met some very agreeable patrons who willingly posed at the Birdcage Theater and Doc Holliday's Saloon.


I needed one more so I called a friend and put her in a costume that my brother altered for a previous event and took her out to the desert to pose as a frontier woman. 


Just this morning I got the great idea to attempt "Ghosting" my kids in their costumes out on the road. 
The technique is not too hard. Like I said though, it takes a model who can hold a pose for a few seconds.

What you need:
SLR or DSLR Camera  set to manual mode
Tripod
1-2 constant light sources
1 strobe
dark or dim lit location

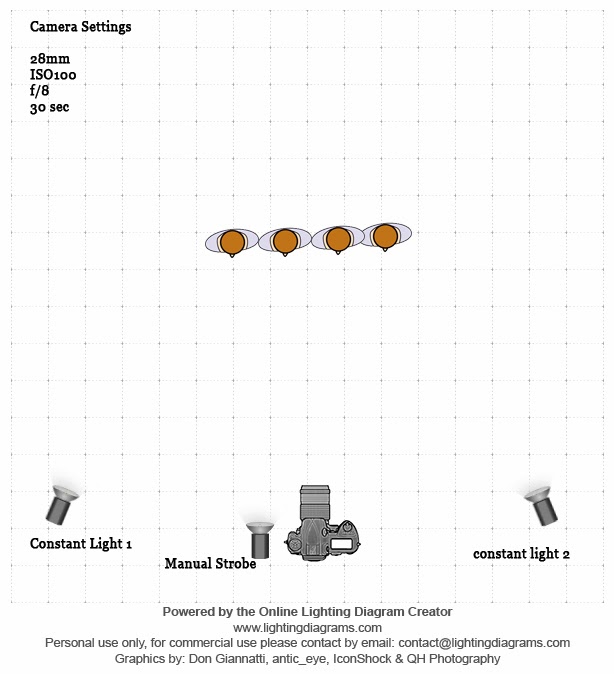
Here is the diagram I made using an online Diagram Creator

These are suggested camera settings. Feel free to bracket them as you see fit. The lights can be moved around as well. This is just how I set them up this evening. 

I set the shutter speed to 30 seconds with the aperture at f/8 and ISO100.
With the shutter being open that long, it is imperative to have a tripod so your background stays sharp. 
The constant lights will be on the whole time aiding in the exposure of the image. 

Now here is the trick for the treat.

Have your model pose at the desired distance from the camera. Press the shutter release button on your camera. If you have your strobe synced to your camera, that works great; if not, fire your manual strobe quickly after pressing the shutter release. 
Count to 3
Have your model hastily move out of the frame until the shutter closes. 
This will take a few tries, but in the end, it is a fun effect. 


I would love to see the images you create with the "Ghosting" effect!
I hope you all had a safe and fun Halloween.


Color Correction Tutorial - PS

I finally found a moment to edit an image for a tutorial for all of you. I chose shot from my very first wedding. At that time I was still shooting Auto/JPEG and didn't have Lightroom or Photoshop to edit. Basically, I was as amateur as you could get. This tutorial is for very basic color correction in Photoshop without the use of Auto Color or Auto Tone.

As you can see, there is a blue color cast from the shadow of the building. 
Let's take care of that with Curves!


Select the Adjustments icon and click Curves. The easiest way to take care of the white balance is by using the eyedropper tool and picking a black, grey or white part of the image. Since both are wearing white, I chose the white eyedropper and picked the lightest white in the image. I believe I chose a spot on the groom's collar. I highly suggest visiting Digital Photography School - Practical White Balance


Well, gosh, there is still that blue color cast on the bride's dress, so let's choose the selective color adjustment layer and lighten the blue and cyan. That's better!


Time to merge those layers!


I personally like to add a curves layer and then blend it as an overlay at 20 percent opacity, but that's just me. 
Hmm, their skin looks a bit flushed, lets's take care of that.

This is why you don't use an action on every image, because they usually need to be treated individually. I just made a few adjustments in the Red selective color adjustment layer. 


Their skin looks a lot better now. Let's put some pink back in the bride's lips.
Select the mask (the white part) and pick out a small paintbrush and paint her lips with the black paintbrush. This will put the red back. 


We are going to stop here. Stay tuned for teeth whitening and eye brightening in a later tutorial. If you liked this tut, leave a comment. Thanks!


Q&A - What do you value in photography?

I asked a handful of you what you value in photography. Here are your answers. Thank you for your participation.
  • Lighting
  • Composition
  • Reasonable price
  • High quality images
  • Style
  • Photographer’s ability to direct a shoot
  • Willingness to listen and implement client’s wishes
  • Ability to catch special moments
  • Lively images
  • Quality of the images
  • Quick time it takes to receive said images
  • Punctuality
  • Creativity
  • Compatible personality / quick to build a rapport
  • Convey a story and do justice to their subject by setting a mood and depicting true character, whether it's the character of their subject or their opinion.
  • Friendly
  • Edited well
  • Individuals in image look good
Are there any they missed? What do you value in photography? Please leave your answer in the comments.


My interview with Eric Cassée

      For my Portfolio Exploration course at the Art Institute, I got to interview a professional photographer in my area. It was awesome, so I want to share it here on the blog!

1.       Who is your target market?
Eric Cassée –That is a tough one. I have primarily 3, High end portrait, fashion, and beauty. High end is like Esquire, Wire, that kind of thing.  Shooting stars, politicians and regular people. In art and commerce, beauty, that is subjective. It is up to the beholder to determine if it is appropriate for advertisements as opposed to commercial.
 ©Eric Cassée
 
2.       Do you have a printed portfolio? What do you usually use it for? When did you stop using a physical portfolio?
Eric -Yes. It is invaluable as a tangible way to market myself to have something to talk about at a meeting. I can tell people about the prints they are passing around. This way people remember me as well as my art. It is an association thing. Even if they will be seeing stuff they have already seen on the site. Secondly, when it goes with Wonderful Machine (a company that represents artists and drive art directors, publishers to their site as well as assist the artists with marketing).  Then all the prospective clients will look at the portfolio along with several others to choose which artist fits their bill.
©Eric Cassée
 

3.       What types of portfolios do you use?
Eric - Both printed portfolio and website. You have to have a website.

4.       What colors and fonts do you use in your marketing materials and/or portfolio? Did you choose these or hire a designer?
Eric- I chose them. It is all custom; some people used designers. The color is white and minimal linear font as not to distract from the images.

 ©Eric Cassée
 
5.       Where have you shared your portfolio (if printed)?
Eric - Anytime I go to a meeting with an advertising agency or magazine. Any meeting where I am trying to get hired.  Editorial publications and even businesses.

6.       How often do you update your portfolio?
Eric- The web one is always in flux, sometimes with a magazine, I have to wait until it is published. With personal stuff I post it already. On my Tumbler I update it at least once a month. The books are about 600 dollars to print, so I don’t update it any more often than once a year.

 ©Eric Cassée
 

7.       Are your images displayed in any particular order?
Eric- Nah, yeah, sortof. They are scategorized. Online they are pretty organized, in the print they are organized by mood. I like to open and close the book with vivid images with a lot of red in them.

8.       Do you have any advice for emerging photographers when it comes to portfolios, what to do, what not to do, etc?

Eric- Yeah, I think that a lot of people get stuck in the rut where they fill their portfolio with market specific stuff. It is better to demonstrate what you love that you are good at and something that is different while also showing that you are technically proficient to do what the client wants. These shoots generally take 12 hours. Clients need you to be honest about your skill set so they can pair you with the right project. Be identifiable. Shoot what you love. Don’t clutter it up with a lot of subject matter that is all over the place. You need to tell who you are in just 25 to 30 images that leave a distinct impression. Don’t clutter the page with crazy text or graphics either, keep it simple. 

To view more of Eric's amazing work, check out his website at http://www.ericcassee.com or like his Facebook page at /EricCasseePhotography