Showing posts with label Goodyear photographer. Show all posts

What lead to this image.

Inspiration doesn't always come until after I have seized the opportunity. 
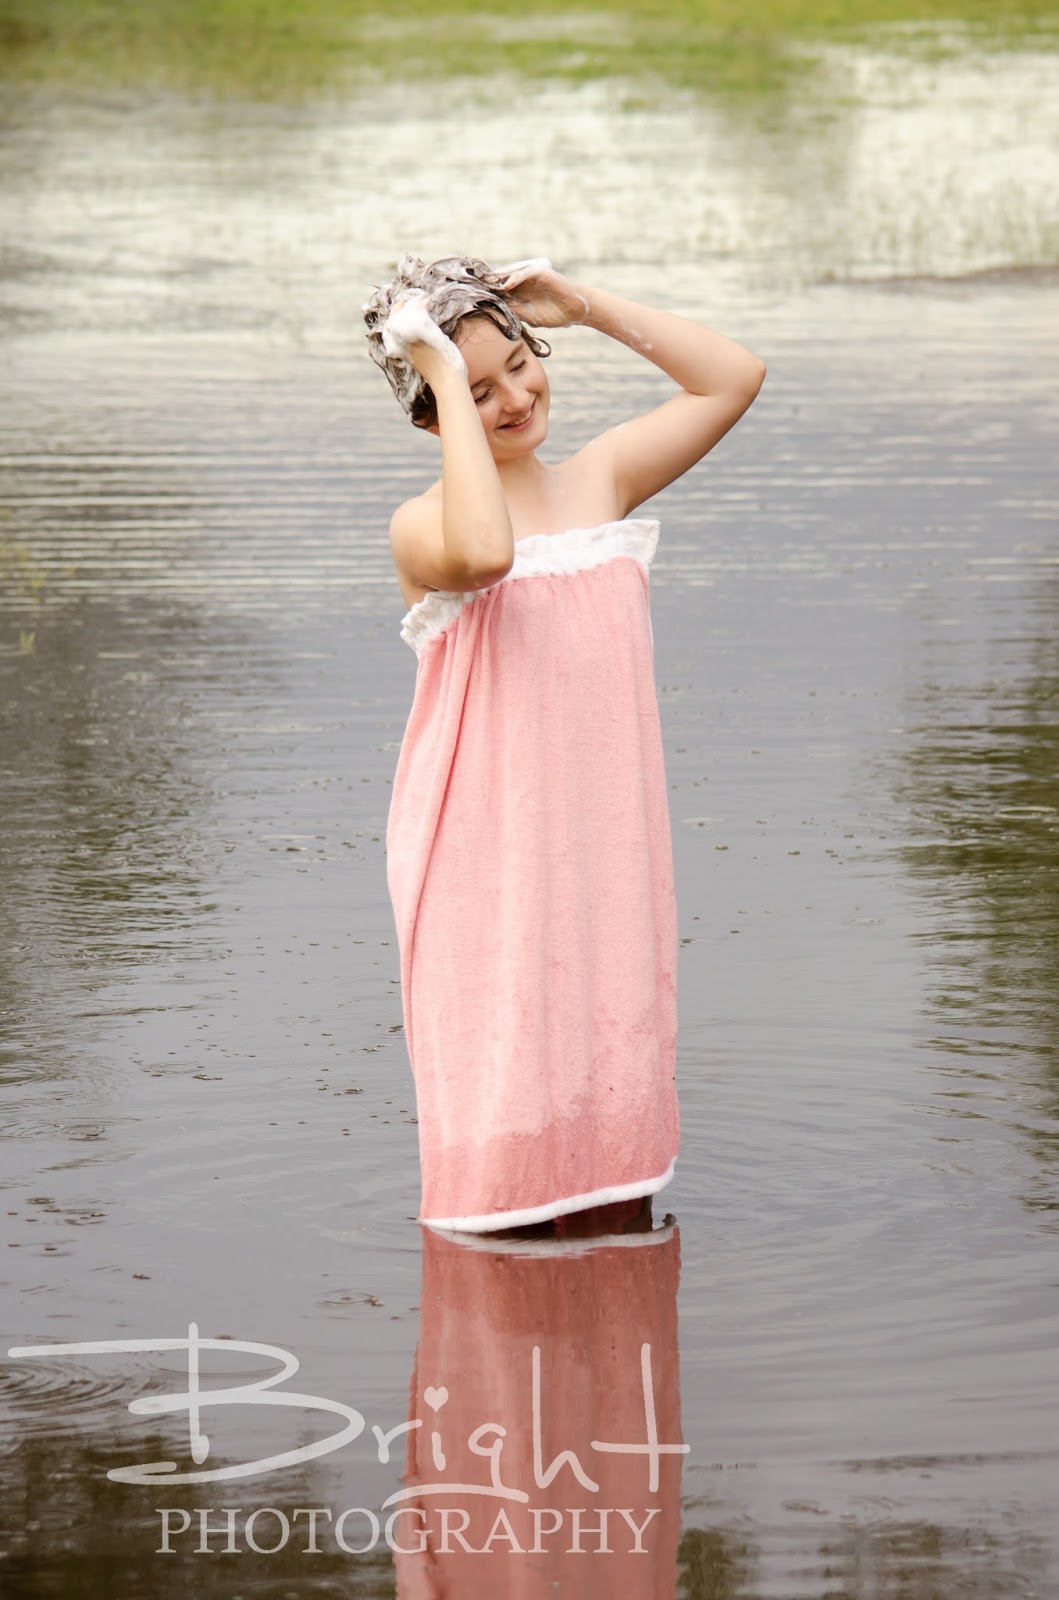
Such is the case with this image, I have titled "Bathsheba."


Monsoon season is something we in the desert of Arizona look forward to, almost how a child looks forward to the ice cream man driving around the corner. 

As a photographer, I know I should seize the opportunity and go take photos, but I never had the inspiration to create something new and different. Oh, sure I could design a paper boat and have one of my children stand in the water and then do a composite of the child in the boat in the water...but that has been done, it isn't new. 

On this Summer day, as the rain poured down in sheets, my children felt my excitement and desire to go create something. "Mommy, are we going to go take photos in the rain?" I said yes, and told my oldest to go get dressed as I perused my boxes of random photo wardrobe items I had begun to collect. I grabbed the pink terrycloth bath wrap I picked up at a garage sale from the free bin and hollered to my daughter down the hallway that I have something for her to wear. Oh, "and grab a bottle of shampoo!"

By the time we reached the desired location and positioned in the right spot, the rain had reduced to a trickle...this displeased me, but I was already here, so I might as well shoot.

As Sadie lathered the shampoo in her hair, I sang a bit from the musical South Pacific, "I'm, gonna wash that man right outta my hair. I'm gonna wash that man right outta my hair. I'm gonna wash that man right outta my hair, and send him on his way!" Those who have had me do their photos in the past know that I will break out into song at any moment.

Our shoot decidedly finished when my daughter spotted a father and daughter walking their dogs toward us and she became bashful. It was good that we stopped, because the dogs came splashing in the puddle to say "Hi" to Sadie.

It wasn't until I was done editing and picking through the images that I decided on the title "Bathsheba." 
Note: This was only because she was "bathing" outside, and has nothing to do with seduction. Yes it is named after the Bible story character, but in a completely innocent way. 

Moral of the story -> Don't wait for inspiration to strike. Seize the opportunity and let the journey inspire the end result. - Danielle Bright

Cute Girl + Nerdy Scarf = Winning Photo!

Sometimes, when I am not taking photos or volunteering, I fill my time with making stuff, like this super cool Doctor Who scarf. I originally made it for my youngest daughter to wear for her birthday photos. A friend saw it and commissioned me to make another as a Christmas gift this year. I have been taking product photos for my clients for years now, I hadn't thought that my side hobby may be a money maker as well. 


So, I asked my kid's babysitter if she would model for me, that way if I do end up opening up an Etsy page, I have decent photos to add to it. 


She took directions like a champ! I was lucky that some of the trees in the desert still had their Autumn leaves. Over all, I would say the shoot yesterday was a success!


Say Cheese?

My youngest has a little camera and is walking around saying, "Say cheese!", and it made me think, why? If someone didn't understand the reasoning behind this request, it would seem quite odd.

The purpose is to make the subject, assuming they speak English and are able to speak, make the "E" sound, and thus turning their mouth into shape resembling a smile.

I have a few other words I use to get clients to make this face. They are, in no particular order:


  1. Mommy
  2. Daddy
  3. Cookie
  4. Puppy
  5. Kitty
  6. Poopy
  7. Papaya
Number 6 is a popular one among little boys. Number 7 makes adults smile just because it is unexpected. 

So, the desired effect is a smile, but unfortunately it can also result in what my family calls the "Chicken Run" face.


I have learned that "cheese" doesn't translate well in Spanish, but the result is humorous enough to get Hispanic clients to crack a smile. "Say queso!"

I recently did what could be called "marathon" portrait sessions at a church nativity event, where families were lined up for a free photo with a pretty backdrop.


I had to get complete strangers to quickly pose and smile for a photo, which means I had to create an instant rapport. I can say it takes a very specific set of skills which have been developed over the years to successfully take photos in this manner of individuals with a variety of personalities.

It takes a lot of energy for me to step into the role of confident, extroverted professional photographer. It is just a facet of multi-dimensional me. :-)

Anyway, back to cheese. Where did this begin? Why cheese and not peas? What do photographers in other countries say to get their clients to pull a smile? Probably not queso.


Photo credit - PetaPixelRotten TomatoesBright Photography

My youngest daughter is 3 and nerdy!

My youngest is the cutest little nerd I know, so I took her to the local library for a fun birthday photo session. The outfit was provided by my best friend Michele.


She wears these cowboy boots everywhere! 


I had originally purchased the dinosaur toy for an experimental shoot with my nephews, but Amelia fell in love.


At the ripe age of 3, she is already a die hard Doctor Who fan. I knit this 10-foot-long scarf for this shoot, so she and I kinda fight over who it really belongs to.


Mommy So Pretty!

One of my favorite memories was of a time when my mother let my brother and I do her hair and make-up. It was a rare treat to play with colors and relay our creative abilities onto her willing canvas, a.k.a her face.
Children have so much love for their mothers and beam with pride whenever they share their drawings.  I came up with this concept a while ago and as it is Mother's Day weekend, I thought the timing would be perfect. I sent out a message on Facebook and invited all women with children ages 2-5 to come to my house for a special photo shoot. I informed them that they need not do their hair or make-up as that would be done for them before the photo. I carefully avoided telling them until they arrived that their own precious toddler would be their make-up artist and hair stylist. While reactions ranged from welcome to apprehensive, all the moms stayed and had a fun time watching their children make them so pretty. I have included the documentary photos as well as the portraits to this blog. 


Mr D. took a while warming up to playing with the make-up. But once he did, it was wonderful. He chose to put a tiara on his Mommy.


Since this little guy is the only boy in his family, he doesn't get too many opportunities to do fun make-up stuff with Mommy. This was a great bonding activity. Look at the focus on his face!


Miss M. focused much of her artistic attention to only one side of her Mommy's face. Still so pretty!


My friends were complaining that I wasn't getting a make-over, so I joined in the fun with my youngest daughter. She wanted to put make-up on herself almost as much as she wanted to do put it on me. I am pretty good at directing a shot, but I am so awkward in front of the camera. My sweet husband helped take my photo.


Some of the Mommies chose to reciprocate the love by putting make-up on their children. Note: There really is no way to pose a toddler, I just have to shoot and pray that I got a good shot. Sometimes toddlers give me the best poses like the one below. 


This poor Mommy was doubly decorated, as both her little girls participated in making her so pretty. The hair style is great too!


I made sure that the children wore large shirts so they didn't get any make-up on their clothes, and sheets on the Mommies for the same reason. Looks like the sheet was slipping in this shot. 


The stylish Mommy is wearing green eyeshadow on her forehead and blue mascara this season. At least that is what Miss H. had in mind for her favoritest Mommy ever. 


Miss A. believes that it is all about vertical line patterns. One must also apply every shade in the lipstick pallet directly to the cheeks


I am so grateful for the wonderful participants for this project. It was so much fun!
If you liked this entry, go check out Adults eating like Babies!

Ghosting on Halloween

I would first like to state that this project is best suited for those who can sit still for a long exposure. Let me share some of my more successful attempts at this strategy before going into the tutorial.

This image of the water spirit was my first attempt at "Ghosting" back in 2011. It took a couple tries, but luckily my parents were good sports.


 On Valentine's Day this year, I drove down to Tombstone for an assignment and met some very agreeable patrons who willingly posed at the Birdcage Theater and Doc Holliday's Saloon.


I needed one more so I called a friend and put her in a costume that my brother altered for a previous event and took her out to the desert to pose as a frontier woman. 


Just this morning I got the great idea to attempt "Ghosting" my kids in their costumes out on the road. 
The technique is not too hard. Like I said though, it takes a model who can hold a pose for a few seconds.

What you need:
SLR or DSLR Camera  set to manual mode
Tripod
1-2 constant light sources
1 strobe
dark or dim lit location

Here is the diagram I made using an online Diagram Creator

These are suggested camera settings. Feel free to bracket them as you see fit. The lights can be moved around as well. This is just how I set them up this evening. 

I set the shutter speed to 30 seconds with the aperture at f/8 and ISO100.
With the shutter being open that long, it is imperative to have a tripod so your background stays sharp. 
The constant lights will be on the whole time aiding in the exposure of the image. 

Now here is the trick for the treat.

Have your model pose at the desired distance from the camera. Press the shutter release button on your camera. If you have your strobe synced to your camera, that works great; if not, fire your manual strobe quickly after pressing the shutter release. 
Count to 3
Have your model hastily move out of the frame until the shutter closes. 
This will take a few tries, but in the end, it is a fun effect. 


I would love to see the images you create with the "Ghosting" effect!
I hope you all had a safe and fun Halloween.


Color Correction Tutorial - PS

I finally found a moment to edit an image for a tutorial for all of you. I chose shot from my very first wedding. At that time I was still shooting Auto/JPEG and didn't have Lightroom or Photoshop to edit. Basically, I was as amateur as you could get. This tutorial is for very basic color correction in Photoshop without the use of Auto Color or Auto Tone.

As you can see, there is a blue color cast from the shadow of the building. 
Let's take care of that with Curves!


Select the Adjustments icon and click Curves. The easiest way to take care of the white balance is by using the eyedropper tool and picking a black, grey or white part of the image. Since both are wearing white, I chose the white eyedropper and picked the lightest white in the image. I believe I chose a spot on the groom's collar. I highly suggest visiting Digital Photography School - Practical White Balance


Well, gosh, there is still that blue color cast on the bride's dress, so let's choose the selective color adjustment layer and lighten the blue and cyan. That's better!


Time to merge those layers!


I personally like to add a curves layer and then blend it as an overlay at 20 percent opacity, but that's just me. 
Hmm, their skin looks a bit flushed, lets's take care of that.

This is why you don't use an action on every image, because they usually need to be treated individually. I just made a few adjustments in the Red selective color adjustment layer. 


Their skin looks a lot better now. Let's put some pink back in the bride's lips.
Select the mask (the white part) and pick out a small paintbrush and paint her lips with the black paintbrush. This will put the red back. 


We are going to stop here. Stay tuned for teeth whitening and eye brightening in a later tutorial. If you liked this tut, leave a comment. Thanks!